Correct Application
Application of the products
Depending on the supply form of your CerMark product, different application methods are used to transfer our laser marking material to your substrate. CerMark products are mostly liquid or paste inks except for LMM6018, which is a tape product. Most of the ink products can be applied to the substrate either by spraying or painting with a foam brush. Two of these products, LMM14and LMM6000, come in aerosol cans and can be used directly. As well as traditional ink products CerMark also has specialty inks for pad printing and screen printing. See each section below for detailed application instructions by supply form.
Clean the surface to be marked (all products)
No matter which product and supply form you choose, the process of bonding between laser marking material and substrate occurs at a molecular level so it is important the substrate be free of all kinds of contamination such as oil, debris, or coatings. Consequently, the substrate should be thoroughly cleaned before the application of CerMark laser marking material: the quality of your mark strongly depends on the cleanliness of the substrate prior to material application. Depending on the substrate, it should be cleaned with a solvent such as alcohol or rinsed with soap and water and completely dried. Be careful not to use a cleaning agent that leaves a residue behind.
Foam brush application
Most CerMark laser marking materials come as a liquid or paste ink in a variety of container sizes. Depending on the application and the industrial setting a regular foam brush can be an easy choice for ink application. To apply the ink, soak the foam brush less than 1/4th of its length (less than 0.25”) into the container. There is no need to soak more than that, otherwise, the ink may splash and result in an uneven coat thickness. Apply with smooth, even strokes. When applying ink with a foam brush the two most important variables to control is dilution and coat thickness.
Even after you have achieved the proper dilution for your product and begun applying the ink you should be on the lookout for changes in viscosity. Since CerMark recommends diluting its inks with denatured alcohol, which can evaporate, an open container of CerMark ink may become more viscous over time due to the evaporation of its thinning agent. This problem is easily overcome by adding a small additional amount of denatured alcohol and stirring continuously until the desired viscosity and homogeneity are recaptured.
The second major issue is coat thickness and consistency. Desired coating thickness varies by product and substrate, so it is important to consult the individual page for your product for exact guidelines prior to application. Most of the time one or two coatings are enough, but for some substrates additional coats may be required. You will achieve better marks using our recommended coating thicknesses than simply applying more ink. If your material coating is too thick it will absorb too much laser energy and fail to bond to the substrate. If your material coating is too thin the pigment density of the material layer will not be high enough to create an optimal mark. It is important to realize that correct coat thickness is often even more important than the accuracy of laser settings for creating optimal marks.
After application, allow the applied marking material to dry. Unaided air drying typically requires several minutes. A fan, heat gun, or hair dryer can be used to accelerate the process to 10 seconds or less. It is important the marking material be completely dry prior to laser marking.
Aerosol Spray Application
Two CerMark products are for sale as aerosol sprays, LMM14, LMC6044, ULTRA and LMM6000. Aerosol cans attract many customers due to their relative ease of handling and stand-alone nature. Both of these products are also available as liquid/paste ink, but aerosol cans have the added benefit of removing the variable of dilution. However, aerosol products still require some experimentation to learn the application process and generate reproducible and consistent results.
Shake the aerosol can thoroughly before use to achieve a homogenous suspension of marking material inside the can. Spray uniformly at a 10” distance from the surface and move the nozzle from one side to the other covering the whole substrate area. Start spraying away from the area to be marked and move towards the opposite side and past the target area. Over-spraying before and after the target area allows the constant velocity of movement and will help provide an even coating on the substrate. As in all liquid/paste ink products, consistency in the application process is important for the quality of the mark.
Again, the desired coating thickness varies by product and substrate, so it is important to consult the individual page for your product for exact guidelines prior to application. Generally, however, the optimal wet film layer thickness for metals is about 0.5 – 2 mils. As both aerosol products are for use on metal, one or two coatings are typically enough. You will achieve better marks using our recommended coating thicknesses than simply applying more ink. If your material coating is too thick it will absorb too much laser energy and fail to bond to the substrate. If your material coating is too thin the pigment density of the material layer will not be high enough to create an optimal mark. It is important to realize that correct coat thickness is often even more important than the accuracy of laser settings for creating optimal marks.
Allow the applied marking material to dry. Unaided air drying typically requires several minutes. A fan, heat gun, or hair dryer can be used to accelerate the process to 10 seconds or less.
A note on safety: All aerosol sprays represent airborne liquid droplets and solid particles. During the spraying process this matter “floats” in the air. You should exercise the same precautions you would work with any kind of aerosol: use in a well-ventilated area or use a breathing mask, never spray towards yourself, and wear gloves.
Airbrush spray application
CerMark liquid/paste inks can be diluted to a viscosity appropriate for airbrushing. This method is preferable to foam brush application for any job larger than a few parts. In industrial settings, airbrush application should be carried out in a spray booth with fume extraction, or, at minimum, in a well-ventilated area with a breathing mask.
A standard airbrush (such as Smart Jet from IWATA) generates good results, and you may customize your spray pattern by adjusting the nozzle of your airbrush. Application considerations are the same as above in the Aerosol spray application section.
Self-adhesive tape
CerMark’s self-adhesive tape, LMM6018, removes the variables of dilution and coating thickness during the application, making it the easiest product to use. To apply, unroll a sufficient amount of tape to cover the surface area to be marked and stick it down carefully. It is important the tape have uniform contact with the substrate surface otherwise some areas may not bond properly during laser marking. Care should be taken to remove any air bubbles from under the tape: smoothing down gently with fingers should be adequate to remove air bubbles. If you wish to mark on a surface that is highly irregular with too many bumps or crevices, the self-adhesive tape may not be appropriate because uniform tape-to-substrate contact may be impossible.
LMM6018 Laser Marking Tape. Self-adhesive laser marking tape for creating permanent, high-contrast, high-resolution black markings on raw metal and anodized aluminum
Usage instructions :
1-Make sure that the surface to be marked is free and clear of oils, cleaning films and dust
2-Stick the black adhesive side down carefully. Smooth down gently with a finger to remove air bubbles and ensure uniform contact.
3-Adjust laser power and speed setting based on the chart on the back
4-Laser mark through the white paper backing of the tape
5-Peel away and discard excess tape. If tape remnants remain in the fine detail of your image, these can be removed by wiping with an alcohol-damp cloth
6-If having difficulty removing tape sample from card, use hair dryer to apply heat to release tapePad printing ink
In a production environment, pad printing is a commonly used process for quickly and consistently applying a wet film of material over a relatively small area (approximately 6 square inches). CerMark has developed specially formulated materials that can easily “drop in” to a standard pad printing process. The LMP500 inks are designed to deliver the appropriate thixotropy for pad printing and are conveniently packaged in small sizes which can be used to fill the pad printer’s ink cup without unnecessary mixing, dilution, and wastage.
The ink cup of the pad printer should be completely filled with CerMark material. The ink requires minimal mixing as this takes place during the normal printing process. The pad printer can then be used as normal with the appropriate mask for the image being printed. To avoid having to align the laser to the printed image, we normally recommend that a “block” of material is printed on the part. The laser is then used to bond the exact graphic image; following this, the excess materials are easily washed away using an appropriate washing agent.
To ensure the correct wet film thickness, it may be necessary to do multiple passes with the pad printer, depending on the substrate and darkness of the mark required. This is easily achievable due to the fast-drying times of the ink
Because of the nature of pad printing inks, CerMark recommends that excess materials are removed from the part using a Burlin Safety Clean solvent. For cleaning the equipment and tooling between shifts, there is also a recommended thinner which can be purchased from the hardware store.
Screen printing ink
Where the application requires printing materials over a large surface area such as a control panel or fascia, screen printing offers a quick and consistent method. CerMark has material formulations which are specifically designed to work with a standard silk screen printing process.
The liquid coat will be consistently applied in a single pass, the thickness is controlled by the printer’s mechanical settings such as “snap off”. The inks should be mixed to avoid bubbles that can cause “fisheyes” and, as with all materials, the surface being printed should be free from any debris or contamination.
Designing a Test Grid
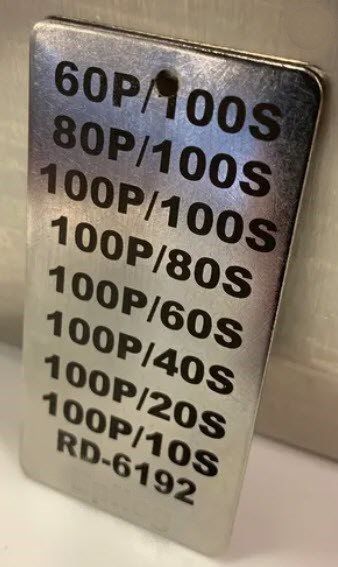
The goal is to make a series of marks on the metal you want to laser that will vary from low heat to high heat. The grid should look something like the one shown in Figure A. In this grid, P denotes % Power and S denotes % Speed. Speed can also be stated in inches and millimeters per second. Adjust your laser´s setting to match the selected colors, and mark the substrate. Contact your laser manufacturer or reference your laser Owner’s Manual to understand Color Mapping.
After you have marked the object, you should observe a variety of marks that range from barely visible to slight destruction of the substrate as seen in the figure B After completion of the test grid, test the durability of marks using an abrasive kitchen pad. Review results and choose settings that give a durable mark without overpowering or damaging the object. See Figure A.
Note: If your laser system speed is controlled by millimeters per second created the speed steps in increments of 50 mm/sec starting at 50 mm/sec
Evaluating the Test Results
After laser marking the part, wash off the CerMark and observe the variation in the marking quality. They should range from barely visible to a slight destruction of the substrate, as seen in the photo in figure B.
Now, scrub the test marks using the green abrasive side of a kitchen scrub pad. The mark with the highest contrast and durability will be your settings. Be careful not to overpower or damage the part. Remember the mark is only as durable as the surface you are marking on. In this example, settings at 100% power and 30-60% speed are optimal.
If you are using a lower wattage laser, i.e. 25 or 30 watts, and are having trouble marking aluminum & brass substrates, increase´your Dots per Inch (DPI). This will deliver more energy to the surface of the substrate, or, start your test grid with 100% power and 20% speed stepping the speed down as you go.
Marking Glass
Technique #1. Laser marking direct onto glass substrate
Simply this is marking directly on the glass without coatings or additives; without using any pre-mark surface preparation. From the manufacturing perspective this is the easiest to implement as it is simply using the heat from a laser beam to mark directly on the edge of the finished optical lens.
Method A. Using a CO2 laser to mark.
1. This ablates any coatings such as magnesium fluoride, silicon oxide, zinc sulphide…etc… on the edge of the glass and causes a controlled surface micro-fracturing directly on the glass at the lens edge. The result is often an opaque/white looking permanent mark with character widths typically between 200 micron to 300 micron (0.008 inch to 0.012 inch).
2. Using a CO2 offers the best dollar per watt value for laser processing. In some cases when laser marking of ultra thin optics or for those lenses used in harsh environment applications, this type of laser may create stress fractures around the heat affected zone.
Method B. Using a solid state 532nm (visible green) laser to mark.
1. This also ablates coatings but the 532nm wavelength puts less heat into the glass substrate reducing the micro-fracturing occurring by about 50%. The result is often an opaque looking permanent marked directly into the glass with character widths typically between 100 micron to 150 micron (0.004 inch to 0.006 inch).
2. Using a solid state 532nm is recommended when small spot size and a reduction of applied heat, (thereby, reducing micro-fracturing) is required.
Technique #2. Laser marking by laser bonding additives to the glass substrate
This technique uses a commercially available ceramic or glass fritz bonding agent such as TherMark or Cermark that is applied before laser marking. Typically this technique is used with a lower powered CO2 laser which uses the heat of the laser not to mark directly into the glass substrate but rather to bond the ceramic fritz onto the edge surface of the glass substrate.
Laser bonding offers a solution for creating permanent, high contrast, high resolution marks on a wide variety of surfaces. There is a limited selection of bonding colors such as black, blue, red yellow and white.
Laser bonding offers the least possibility of micro fracturing of the glass substrate but requires the greatest pre-mark preparation and post-mark cleanup.
The decision to mark directly into the glass lens or using a bonding additive depends on the cosmetic look you are wanting (e.g. high contrast colors) to achieve and the end application of the optical lens. For instance lenses used in high vibration areas or in space applications where the lens is exposed to pressure and rapid temperature changes should be considered candidates for laser bonding,
The draw back to laser bonding and using the required bonding additives is the amount of manual preparation and cleanup labor needed on each individual lens.
Compositions: Some come as liquids and others as pastes. Recommended dilution ratios vary depending on these product differences and your desired application method. For most applications on most surfaces, however, the ink should be diluted enough to flow easily with roughly the viscosity of “Half & Half”.
Recommended thinning agents also vary by product. For water-based laser marking inks, CerMark recommends denatured alcohol (preferred) or chemical-free demineralized water (alternative). Either is acceptable, but CerMark inks diluted with denatured alcohol will dry faster than those diluted with water. For alcohol-based laser marking inks, CerMark recommends denatured alcohol (preferred) or acetone (alternative).
When working with thinning agents, remember it is always possible to add more thinning agents, but it is difficult to un-dilute, so add thinning agents slowly. Over-dilution may result in a runny pattern after application and insufficient pigment density to create optimal marks. However, if you over-dilute CerMark laser marking ink it is possible to reverse the error. By exposing the over-diluted ink to air for a time, the thinning agents will eventually evaporate, and the ink will reach the desired viscosity. Since alcohol-based thinning agents evaporate especially fast this is another reason why denatured alcohol is the preferred thinning agent.
Evaporation may also result in viscosity change during the application process, especially when working with a foam brush and an open-lid container. It is important to monitor the viscosity of your ink and add more thinning agents as necessary to ensure consistent application. Gloves are recommended when handling thinning agents and are available at any local hardware store.
Friends recommendations:
Keep In Mind That All Lasers React Differently Depending On The Substrate, the Wattage, The Laser Brand, the tube wear , the lenses adjustment and other factors .
1) 50 Watt System / LMC6044p Spray
Tile > 100 Power/70 Speed - 500/600 Dpi
Glass > 100 Power/55 Speed - 500/600 Dpi
2) 35 Watt System/LMC6044p spray
Tile > 100 Power/50 Speed - 500/600 Dpi
Glass > 100 Power/35 Speed - 500/600 Dpi